Sunday, December 29, 2013

Pink Owl Bento

Hello Everyone!

Today's post is more food art than bento, as I wanted to eat dinner at a reasonable time last night. Originally this was going to be a bento honoring the 2003 film "The Last Samurai", starring the amazing Tom Cruise. I was going to do a sword and Japanese characters on the plate that said 'bushido', the code of honor Samurai had to follow (both to be made out of nori). Sadly I ran out of time, so I decided to go with a pink owl sitting on a Sakura branch.

Oh and by the way I have a brand new inventory for my bento tool kit! I got 10 food markers, 4 vegetable cutters and 4 cookie cutters (squirrel, heart, flower and star), so I was excited to use some of that in today's post. :)


From these, I used the Sakura flower vegetable cutter, 'Daisy' cutter (the one with so many petals) and my orange and pink markers.

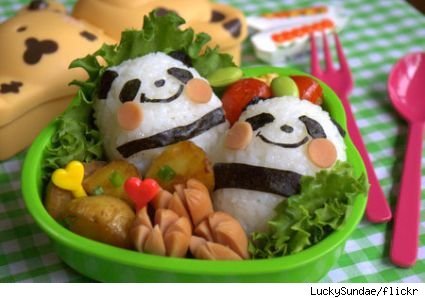
Here is the owl food art!!


The actual sandwich is made with eggplant curry (Indian dish that we call "Bengan", meaning eggplant), mozzerella cheese, lettuce leaves and a dinner roll. 

I used the Sakura cutter to cut out the flowers from mozzerella cheese, and colored the tips with my pink food marker. A tip about working with these markers is that they use food coloring, so dont shake them or food coloring will spill everywhere, and if it does spill, clean it up right away or it will stain. I learned this the hard way as there are still some pink stains on the counter. :p  The flowers are colored sparsely because the pink marker didn't work so well with the cheese. 


To make the branch, I cut a strip from a Hershey's chocolate bar and placed it on the warm bread. I was too hungry/lazy to do the traditional Bain Marie melting method, where you place the chocolate in a pan on top of another pan with hot water and stir it. I lucked out because I didn't realize chocolate melted fast in small amounts and forgot the bread was warm :) . As it melted, I spread it out with a fork a little so it would look more natural and less rigid. 


For the owl, I used a pink Starburst (apparently is is supposed to be watermelon). Starburst is much lighter and less dense than AirHeads, and I used the rolling pin method again to get it flat. I drew the owl body onto wax paper, cut it out and put it over the candy to cut out. I put this in the fridge and took out my magenta AirHeads. 

This version is a special flavor, Zoomberry, for the promotion of the Disney movie Turbo. Normally, AirHeads does not come in a magenta color. I used the circle (smooth) side of the Daisy cutter on the AirHead. Then, I used the Daisy side to cut out the semicircle with frilly edges, so they could be wings. I also put these in the fridge and took out a square of nori to work with.

I put the remaining wax paper with the owl shaped hole over the nori and cut out the same owl. This was a tedious process as I was using an X-Acto blade, which rips nori if you aren't careful. Then I made a cut inside, and used scissors to complete the rest of the outline. Scissors work a lot better for nori than an X-Acto blade. 

I also cut out the inner eyes and feathers freehand using the scissors (I'm still gaining experience with nori and scissors - I see that the eyelashes came out way too thick).

The eyes, beak and feet were also freehand. Since I couldn't find something easy to use and orange, I went with the food marker and colored it.


Thank you for reading! :)


Thursday, December 26, 2013

Sunflora Bento!

Hello Everyone!

 Merry late Christmas and I'm sorry I haven't been posting. I'm really busy this year and I will try to post more bentos if I can.

 Anyway yesterday I made this Sunflora bento to celebrate the Wonderful World of Pokemon! This is a Sunflora (credit pokemondb.net)

 So I guess this is 1/2 of my response to the poll I had in July, asking "Which Kyaraben would you like to see made?" The winner was a tie between Iron Man and Pikachu/Pokemon, so I will be planning an Iron Man bento sometime... (:


Pokemon is my favorite cartoon and I love it so much! I decided to finally attempt a Pokemon bento after waiting so long in fear of messing it up.

 Anyway here's the bento......


To make Sunflora's body I used an American candy called AirHeads. It is a chewy, stretchy candy that comes in artificial fruit flavors like Blue Raspberry, Cherry, Orange, Pink Lemonade, etc. This one is Watermelon. 


The candy that comes right out of this wrapper was not long enough to carve out Sunflora's body so I used a rolling pin to roll it out. This works best when you sandwich it between wax paper so it doesnt stick to your pin. :)


I carved out Sunflora's feet, body and leaves using a regular kitchen knife. To do the stem of the leaves,
I cut it out of cucumber.

For the face, I cut a circle out of Mozzarella cheese (for the light yellow color) using the bottom of a steel cup as my stencil. 

I cut the petals out of Cheddar cheese, cutting out the first carefully and using that as my stencil to cut out the rest.

I used scissors and an X-Acto blade to cut out the face features.


I placed Sunflora on a parotha (flaky fluffy Indian bread), added a side of yogurt and a side of chicken curry (flavorful Indian stew made with onion, curry powder, chicken, mustard seed, cumin and garlic).

I added cherry tomatoes in an arc to add some color. If you plan to use AirHeads, I would recommend using a layer of wax paper as they are very sticky. 


And as always, thank you for reading my blog! :)


Sunday, October 20, 2013

Snowflake Egg Bento

Hello Everyone!

I am so sorry I haven't been able to post lately - I am busy juggling many things, including continuing flute (best. instrument. ever.)! I was so excited to be able to make this bento since I hadn't made one in a while. This one accompanied me with Tyler Perry's Madea's Big Happy Family. I know I messed up my tradition of kyarabens and movies but how do you do Madea?

Anyway this is the bento!


The container the egg is sitting on is a wooden bamboo container that I just got for my bento inventory (yay!!). 

To do this bento, I toasted a chapathi (Indian wheat bread) and broke it into edible pieces (I toasted for too long though, so it came out really crispy), and placed it with a side of yogurt. 

I put my side dish, a spinach and cottage cheese curry, on lettuce and put that in my new container. I placed orange cherry tomatoes inside along the edges.


For the egg, I cooked it sunny side up and then cut it with a cookie cutter. I punched out my laughing smiley face with my nori puncher and put it on top (I was inspired by the tutorial at kwbentodiary http://kwbentodiary.blogspot.com/ - thank you so much Karenwee!).

As always, thank you for reading my blog!


Saturday, August 24, 2013

Crab Sandwich Bento!

     Hello Everyone! I'm sorry I haven't made any posts lately - I've been busy with all sorts of stuff.

    Today's bento will be a crab croissant sandwich (idea credit pictures on the internet and the Disney Family Fun Magazine). I wanted to make these a while back but never got around to it - until now!

    To start, toast a small, curved croissant and fill it like a sandwich, for the body. This is all of my ingredients for the sandwich - you can never have too much cheese! (:


    For the legs, cut carrots (ideally baby carrots in half but I improvised here because I didn't have any).

    Cut the outer skin of a tomato with a little bit of the fruit, and cut into the claw shapes pictured here.

    For the cutest part, take a small measuring spoon and use it to scoop out cream cheese into little balls. For the face, I used my laughing smileyface Nori puncher (isn't it awesome!) and stuck the eyes onto the cream cheese and the Nori mouth. Don't forget to refrigerate the cream cheese balls if you aren't using them right away!

    Tada! The croissant broke a little because it was too crispy. :(  Difficulty rating: 4.0 (I like saying 4.0) for cream cheese eyes - it's a pretty simple and cute bento! Crabby (I nicknamed him crabby, like the Pokemon) is pictured along with a side of dragon fruit (it tastes like a less sweet but soft version of kiwi and is super tasty).


        I'd love for you to try it out - is there anything you would have done differently? Thank you for reading my blog!


Monday, August 12, 2013

Mission Impossible: Ghost Protocol Bento!!!

Hello Everyone!!

   Today's post is about making a Ghost Protocol Bento!!!!!!!!!!!!!!!!!!!  Yay!!!!!! Personally Ghost Protocol is the best film in the series. Did you know the Burj Khalifa stunt scene is real??!! Yup, Tom Cruise scaled and sat on top of the tallest building in the world. No biggie right? :D

    I decided to do the Burj Khalifa scene (in the movie). Difficulty rating: 9.5 (out of 10) for detail, time (it took me 4.5 hours!), and the fact that it is a complex bento (lots of pieces to put together between Nori, cheese, wax paper pieces etc.).

   On the other hand, difficulty rating for climbing the Burj Khalifa: 11/10.  (;

   Since it's a long step by step process, I am going to post the final product pics first. "No Plan, No Backup, No Choice" refers to the catchphrase for the M:i-4 theatrical release posters. Personally I think it turned out pretty well (the bento - but the movie was incredible).


          Burj Khalifa scene picture taken from http://insidemovies.ew.com/2011/12/22/box-office-update-mission-impossible/
      
      The pic on the right is my sketch of the bento (I do sketches when its a complex bento like this one). Where it says "legs" pointing to the neck and right arm I mean same as the legs, as in do the Nori outline. If you want that extra detail on your bento, doing limb Nori outlines really helps!


      I started by drawing the blueprint, and making a larger sketch of the body onto wax paper.

      I put the wax paper outline ( I will try to do more pics of the bento process in the future) onto a long slice of cheese  and cut the outline with a knife (I sliced a rectangular block of cheese horizontally-it took a few tries). I left that in the fridge and kept the wax paper outline.

     I cut up all the parts of the outline I wanted to do with Nori (gloves, arms+legs for outlines, pants, black squares as pockets for belt between shirt and top in bento pic, shirt, and shoes).


     These are the wax paper pieces I wanted to cut from Nori. I took the wooden cutting board (the one below the Betty Crocker) and put the sheet of Nori on it. Then I placed the wax paper pieces and cut them out with an X-Acto knife (this works pretty well). For the limb outlines, I cut the arms and legs out of Nori (the whole thing) and cut the edges off. Here is the finished Nori outline:


      To do the hair, I cut the head from the cheese outline (I was forced to behead it :(  ), spread cream cheese on it and dipped in cocoa powder - the cream cheese helps it stick, but butter or frosting would also serve the purpose.

      For the building, I took a slice of bread and trimmed of the crust. I sliced cheese to form the borders of the windows, and used food gel to do the blue parts of the windows. If you want evenly blue windows, I would recommend whipping cream cheese and a little butter and then adding food gel for the blue color, so you can spread it like frosting (cream cheese and butter are the essential components of cream cheese frosting, cream cheese makes it dense and butter makes it fluffy, so keep experimenting with them to get the proportions and consistency you want). I didn't realize this until later, otherwise I would have done that instead. 

     The movie was amazing though (an M:i fan - this is my 2nd time watching it). The acting is great (also a Tom Cruise fan - besides Mission Impossible my favorite Tom Cruise movie would be Knight and Day) . He does practically all of his own stunts! Not to mention the music (by Michael Giacchino - especially "A Man, A Plan, A Code, Dubai" and "Mood India" from the soundtrack). In the scene at the end they are actually playing "Ethan and Julia" by Giacchino, from the 3rd film - which makes sense because that's Julia's first appearance. Not sure how they are going to top it as a film in M:i - 5 but that's their own Mission: Impossible right? Which technically means they will, because they always get the mission accomplished! (yay!)

     Thanks for following!


Friday, August 9, 2013

First Poll Results!

Hello Everyone!

   The polls are in! I have started a poll asking "Which Kyaraben would you like to see made?"


   This polls choices were
 

    1- Mickey Mouse
    2- Pikachu/Pokemon (my favorite cartoon!)
    3- Matrix (an amazing film)
    4- Iron Man
    5- James Bond
    6- Other (specify in comments)

     And its 50/50 between Pikachu/Pokemon and Iron Man! I guess I'm gonna have to make both (:


     For those of you that didn't get to vote, don't worry! I will be posting another poll soon (after I make and post Iron Man and Pokemon).
 

    Thanks for participating and thank you for following this blog! My next bento post is coming soon (hint: it's an action film from 2011). Thanks again!

Tuesday, August 6, 2013

Owl Bento (breakfast)

Hello Everyone!

     Today's bento is an owl bento, for............. breakfast! That's right! This is my first breakfast bento (usually they are for dinner, and maybe lunch).

     I made the owl eyes with two respective halves of a bagel, covered with cream cheese for the white part and chocolate for the pupils. I left the chocolate to soften outside before I cut it, so it would be soft and easy to slice.

     The beak is made with a slice of peach laid on its side, and the outline is peanuts (I put cream cheese on some peanuts so they would stick to the curves of the plate - its a good trick).


     So you people can start making bentos of your own, I have decided to start putting difficulty ratings on each post. I would recommend starting with the lowest ratings and working your way up.

    On a scale of 1 to 10, 1 being really easy and 10 being really hard, I would rate this one as a 3. It's pretty simple and looks super cute (if I say so myself)!

    Tada!


Panda Express Bento

Hello Everyone!

  For bento blog network's (http://www.bentoblognetwork.com/) weekly theme, wheels, I am making a Panda Express bento!

   Panda Express as in a train with a panda (not the restaurant, but it is a pun on the name).

   To make the panda head and train, I used the cling-wrap method with sticky rice (same for Mimzy). I used scissors and an Exact - O blade to cut the Nori (I told you it would come in handy).

    I decided to put a bunch of gummy bears since its a panda train. The champagne grape bunch is meant to be a bush.

    For a difficulty rating (1 is really easy, 10 is really hard) I would give this one an 8, since you have to  take measurements into account (train and lettering), start early and refrigerate the cling wrap shapes so they'll stick, cut the panda face freehand, and add more details (see I didn't get it exactly right).

    I mean, what's better than a panda train??!! Well if you said something like Pokemon or Mission Impossible, technically you'd be right. (:

    Tada! It won Bento of the Week!


Wednesday, July 31, 2013

The Last Mimzy Bento

Hello Everyone!

         Today's post is about making The Last Mimzy bento!


         I wanted to make the rabbit doll from the film (right). I figured my best bet would be using sticky rice, molding it with cling-wrap. If you've never worked with sticky rice before, it is hard to mold with just your fingers because it sticks to them, even if you wet them with salt water (it wears off).

   But nothing sticks to cling-wrap!!! This makes cling wrap the perfect tool. Start by spooning the amount of rice you think you'll need onto a piece of cling-wrap. Then wrap it up and start pushing and squeezing it in various ways to mold it (kind of like clay).


          The rice ball on the left is the head. The spooned rice will become the body. After you finish molding the whole rabbit it should look something like this:


           You can either finish the rabbit or store the parts and work on it right before you plan to eat (I stored mine). To add the brown and white fur I laid the parts out on a plate and put soy sauce using an eyedropper, leaving some parts white like the bunny in the picture. I cut the face features, toes and fingers out of nori. 

          Difficulty rating: 7 for soy - sauce dropping, shaping, Nori details and time (do in advance to refrigerate cling-wrap items so they hold well).

           Tada!


Sunday, July 28, 2013

Monsters Inc. Bento

Hello Everyone!

    Today's post is about making Monsters Inc. Bento, in time for the release of Monsters University! Monsters University was actually pretty good. The short before the film was cute too. But they released it 12 years later (Monsters Inc. was released in theaters in 2001) !


    I decided to base the bento on Mike Wachowski, the main character (or one of them, anyway). I skipped unnecessary details like his fingers, claws, toes and teeth - I just wanted to capture the idea of Mike Wachowski in this bento (or dinner meal, rather - this one isn't in a bento box).


      I used my Nori puncher for the mouth, the cucumber skin and more Nori (freehand cut - as in, without a puncher or other tool) for the face features. I cut the skin off a circle of cucumber and used it for the body. I cut the arms and legs from more cucumber, and used the brown edges of a corn muffin for the horns.

     Difficulty rating: 4.5 - its pretty simple! Just cutting everything out, really.

      Tada!


      Mike is sitting on a puddle of yogurt, along with a Parota (fluffy Indian bread), beef stir-fry and roast veggies. Thanks for following!                     


Friday, July 26, 2013

Bento Bites: Using A Nori Puncher

    Hello Everyone! I have decided to start a new series of posts called Bento Bites, to simplify making bento. If you are new to bento, you may want to start here and work your way up to full-on bento.

   In today's post we will be using a face puncher to create simple and simply cute Bento Bites.


   You can find Nori punchers at Amazon.com (that's where I found mine). A Nori puncher is almost exactly like a hole puncher, (so technically if you have a nice hole puncher you could use that too) except it punches out faces out of Nori.


    Put the nori in the puncher and punch out a face, like this:


    Then simply put the design onto your food! Here I am using a quick omelette topped with snowflake cheese (using my cookie cutter).

    The second picture is an egg on top of curry, along with tomatoes - its from my "Snowflake Egg" bento post.


   And that's it for Bento Bites with a Nori puncher. Thanks for following and good luck trying it out!

Minority Report Bento

   Hello Everyone!

   Today's post is about making a Minority Report (the movie) bento*.

   In the film, John Anderton (Tom Cruise) wears this really cool watch, so I thought I would base the bento on that.


    Obviously the watch is too intricate to add every detail to the bento version, so I decided to go with the numbers on the outer ring, the needles, the white and green circles and the stars (on the green circle).


   Using an Exact-o blade and a wooden cutting board I cut the numbers, circles and needles out of Nori. I cut the stars out of a cucumber ring and used the ring as the green circle. To get the white circle shape, I cut the watch silhouette out of Nori and spooned sticky rice onto it, then I added the Nori details and cucumber. In the bento the watch is on top of a bowl of Mac and Cheese.

     Difficulty rating: 5 for cutting the numbers, working the rice (but it would be easier if you used cling wrap, when I made this I didn't know), and getting reasonable proportions on everything, plus a good watch shape.

 Tada!


Personally, the film was a bit dark but it makes a pretty good bento! Thanks for following!

*This bento is technically not a Kyaraben, as it doesn't have a character.

Tuesday, July 23, 2013

A Bento Inventory

   In my last post I talked about what bento is. You may want to check that out if you haven't already, especially if you are new to bento.

   Let's talk about supplies (yay)!

   So since bento is about making art with food, you are obviously going to need basic kitchen supplies. You will also need some sort of a bento box (you can be creative) and things to help you sculpt ordinary food into art. You don't have to get too elaborate here - you should start with stuff you know you need and add on to your collection as you do more and more bento. My hardest step was figuring out a good bento box, until I finally decided to start with an Indian Thali Tray and upgrade later.

   Even though Nori is a food and not exactly equipment, I consider it a must have for Kyaraben making. It is very easy to cut (pretty much like paper) and is great for all sorts of face features.

   Here is my Bento Inventory:


There are:

2 cuttingboards
4 Knives
3 snowflake cookie cutters with two accessories to make the holes (for shaping sunnyside up eggs)
1 Thali Tray for putting bento (my bento box)
1 pack of Nori
1 laughing smiley face Nori puncher
1 bowl as a rice mold
1 sheet of parchment paper for sketching faces and making face outlines using rice (more about that later)
1 pair of scissors (to cut parchment paper and Nori)
1 small fork and spoon for finetuning things
1 butter knife to spread things (like pesto)
1 glass dish as a smaller bento box


   My next posts will talk about making Kyaraben. If there is anything else you think I should post please let me know in the comments. Thanks for following!

An Intro to the Amazing........ Bento!!!

Hi Everyone! My name is Sara, I live in the U.S., and I just started making bento 6 months ago.

Ok, so what is bento? Bento, like most awesome things, is from Japan. Although it originated in China, it is more commonly associated with Japan. Bento literally means (in Japanese) "a nicely packed meal in a box". There are many different types of bento, such as Kyaraben, or character bento, where you make a bento starring a popular character (like Tom and Jerry, Pikachu, Mickey Mouse, Winnie the Pooh, Hello Kitty, etc.), Chuka Bento, with Chinese food, Kamameshi Bento, served at railway stations, and Shidashi Bento, the kind you get at a restaurant ("Bento" at wikipedia.org). Awesome, right? (in case you don't know the answer to that question its yes)  This blog is about making Kyaraben.

 People all over the world use stuff like leftover pizza, chicken nuggets, pasta, noodles, rice, wraps, etc. for bento. Really you can use whatever you have that's edible. You can also use traditional Japanese food like Onigiri and Sushi. For those of you that don't live in Japan, you can buy Nori (roasted seaweed) and sticky rice from an oriental grocery store and make Onigiri and Sushi. Onigiri is harder than it looks though - molding sticky rice is not easy. For some reason they call Onigiri in Pokemon jelly donuts. Nori is also really useful for making Kyaraben faces.


A Kyaraben (Photo Credit: Lucky Sundae at http://reyskakes.tumblr.com/)


So that's about it for now. I am going to post more about what you need, and the process of making bento. Thanks for following! ; )